Protecting Internet-facing SSH access with MFA on Ubuntu 16.04 (while running standard SSH for allowed addresses)

When it comes to secure access to a remote server, such as an AWS EC2 instance, you have couple of options. The preferred option is to have the instance (or the server in a data center or other similar environment) within a private network (such as a VPC in AWS), only accessible by SSH over a VPN (either your own OpenVPN setup, or IPsec available from AWS). However, not having a fall-back SSH connectivity is not always practical or feasible, even if it be just to access a gateway instance that likely serves as a bastion host. This is obviously not applicable to environments where nothing is strictly ever done over SSH, and everything is only ever done over configuration management, but such environments are far and few between.

The following outlines my preferred method of setting up SSH access on the gateway instance. Because the configuration parameters differ between the MFA-protected, but IP-unrestricted SSH server, and the one that servers connections from the allowed addresses/CIDR ranges, it is best to run two separate SSH daemons.

Before starting this process, make sure that the normal OpenSSH access to your server/instance has been configured, as this article mainly outlines the deltas from the standard SSH setup. So let’s get started!

  1. Install `libpam-google-authenticator`:
    sudo apt-get install libpam-google-authenticator
  2. Make a copy of the existing `sshd_config`:
    sudo cp /etc/ssh/sshd_config /etc/ssh/sshd_config_highport
  3. Modify the newly created sshd_config_highpoprt:
    • Select a different port, such as 22222:
      Port 22222
    • Allow users who should be allowed to use the MFA-protected, but IP-unrestricted SSH access:
      AllowUsers myusername
    • Set Google Authenticator -compatible authentication method:
      # require Google Authenticator after pubkey
      AuthenticationMethods publickey,keyboard-interactive
    • Set `ChallengeResponseAuthentication`:
      ChallengeResponseAuthentication yes
    • If you have configured any `Match address` or `Match user` entries in your primary SSH server’s sshd_config file (whose copy we’re editing), remove them from the copy. For example, you might have something like this configured for the primary SSH instance:
      Match address 10.10.10.0/24
      PasswordAuthentication yes
      
      Match User root Address 10.10.10.0/24
      PermitRootLogin yes
      
      Match User root Address 100.100.100.50/32
      PermitRootLogin prohibit-password
      

      If you do, remove them from `sshd_config_highport`.

  4. Make a copy of `/etc/pam.d/sshd`, and modify the copy, like so:
    sudo cp /etc/pam.d/sshd /etc/pam.d/sshd2

    Then add on top of the `sshd2` file:

    auth required pam_google_authenticator.so

    .. and comment out the following line in the file:

    @include common-auth

    like so:

    # @include common-auth
  5. Now run `google-authenticator` as the user who you want to be able to log in as over the MFA-protected, but IP-unrestricted SSH-service. Do not use root; use an unprivileged user account instead! Once you run it, you will be prompted to answer: `Do you want authentication tokens to be time-based (y/n)`. Answer `yes`, and the system will display a QR code. If you don’t have a Google Authenticator -compatible app on your smart phone/tablet yet, install one. I recommend Authy (Android / iOS). Once you have installed it and created an account in it, scan the QR code off the screen, and also write down the presented five “emergency scratch codes” in a safe place. Then answer the remaining questions, all affirmative:

    – Do you want me to update your “~/.google_authenticator” file (y/n) y
    – Do you want to disallow multiple uses of the same authentication token? .. y
    – By default, tokens are good for 30 seconds and in order to compensate .. y
    – .. Do you want to enable rate-limiting (y/n) .. y

  6. Create a `ssh2` symlink to the existing `ssh` executable (a requirement by service autostart):
    sudo ln -s /usr/sbin/sshd /usr/sbin/sshd2
  7. Add the following in `/etc/default/ssh`:
    # same for the highport SSH daemon
    SSHD2_OPTS=
  8. Create a new `systemd` service file for the `ssh2` daemon:
    sudo cp /lib/systemd/system/ssh.service /etc/systemd/system/sshd2.service

    .. then modify the `sshd2.service` file; modify the existing ExecStart and Alias lines, like so:

    ExecStart=/usr/sbin/sshd2 -D $SSHD2_OPTS -f /etc/ssh/sshd_config_highport
    Alias=sshd-highport.service

    Note that the Alias name (as set above) must be different from the file name for the service. In other words, as in the example above, the file name is `sshd2.service`, the “Alias” must be set to something else that doesn’t previously exist in the `/etc/systemd/system` directory (i.e. in the above example `sshd-highport.service`).

    Then start the service, test it, and finally enable it (to persist reboots):

    sudo systemctl daemon-reload
    sudo systemctl start sshd2
    sudo systemctl status sshd2
    
    sudo systemctl enable sshd2
    sudo systemctl status sshd2

When you enable the service with `sudo systemctl enable sshd2`, a symlink is created by the name of the alias you defined. Following the above example, it would be like so:

`/etc/systemd/system/sshd-highport.service` [symlink] -> `/etc/systemd/system/sshd2.service` [physical file]

You’re all set! Other considerations: If you’re running this in AWS, remember to configure the Security Groups to allow access to the high port SSH from any source (assuming you want it to be accessed from any source), as well as adjust the ACLs and iptables/ufw if you use them. Furthermore, since the MFA-protected SSH port will be accessible publicly, it’s a good idea to install sshguard (some install info here) to prevent port knocking (besides stressing the system some, brute force attacks aren’t much of a threat since the port is now protected by the MFA which also implements access rate limiting).

Finally, since the MFA is time-based, it’s a good idea to make sure `ntp` is running on the your server/instance. Additionally I run `ntpdate` from system crontab once a day to make sure a possible greater drift than what the maximum ntp slew rate can correct in a reasonable amount of time is corrected at least once a day:

sudo apt-get update
sudo apt-get install ntp
sudo systemctl enable ntp

.. and in `/etc/crontab:`

# Force time-sync once a day (in case of a time difference too big for stepped adjustment via ntp)
0       5       *       *       *       root   service ntp stop && ntpdate -u us.pool.ntp.org && service ntp start

(`ntpdate` won’t run if `ntp` service is active)

And there you have it! Now when you connect to the server/instance over SSH from a random external IP (such as from a hotel) using a public key to your chosen user account, you will be prompted for an MFA code (which you have to enter from the Authy app) before the connection is authorized. And because the primary SSH daemon still serves the default SSH port 22, and because it is restricted to the private networks (plus possibly some strictly limited public IPs), those “known”, or “internal” IPs are not presented with an MFA challenge in order to get connected.

Encrypted Vault in Ubuntu for Your Valuable Data

Recently I set up Bitnami Cloud Tools for AWS to facilitate AWS configuration and use from the command line. After creating an administrative IAM (as not to use the main AWS login), and created and uploaded/associated the necessary X.509 credentials for that IAM login, I realized that anyone who would gain access to the local dev server would also gain full access to several AWS Virtual Private Cloud configurations. Not a terribly likely occurrence, but would I like to risk it? Say, when I have the cloud tools configured on Ubuntu on my laptop, someone could conceivably steal the laptop, and with a little technical expertise, gain access to the Ubuntu instance (running in a VM), and hence to the AWS VPCs.

At least in this case having the IAM credentials and the X.509 keys on a USB drive would be impractical (and would probably increase the likelihood that the keys would get misplaced and end up in the wrong hands). On Windows it’s a simple task to set up an encrypted vault using one of many available utilities to achieve such. But how to do that on Linux? After some digging I came across a Wiki entry Ubuntu: Make a secure vault. It worked fine, but via cut-and-paste that appeared rather cumbersome for daily operations. So I set out to write couple of scripts to make things easier.

First, you need to have cryptsetup package installed. Then you can make use of the setup-crypt script below. These scripts are quick utility scripts that don’t have a separate configuration file; you may want to edit some of the variables on top of the script, namely “CRYPT_HOME” (depending on where you want to place your encrypted vault file), “CRYPT_MOUNTPOINT” (depending on where you want to mount it), and “CRYPT_DISK_SIZE” (the capacity of the encrypted vault in megabytes).

#!/bin/bash

CRYPT_HOME=/root/crypto
CRYPT_DISK=cryptdisk
CRYPT_DISK_FQFN=${CRYPT_HOME}/${CRYPT_DISK}
CRYPT_DISK_SIZE=64	# size in megabytes
CRYPT_LABEL=crypt-disk
CRYPT_MOUNTPOINT=/mnt/crypto
LOOPBACK_DEVICE=`losetup -f`

CRYPTSETUP=`which cryptsetup`
if [ $? -ne 0 ] ; then
  echo "ERROR - cryptsetup not found! Install it first with 'apt-get install cryptsetup'."
  exit 1
fi

IAM=`whoami`
if [ ! "${IAM}" = "root" ]; then
  echo "ERROR - Must be root to continue."
  exit 1
fi 

SETUP_INCOMPLETE=true

function cleanup {
  if [ ! "$1" = "called" ] && [ ! "$1" = "nodelete" ]; then
    echo
    echo
    echo "Crypto-disk setup interrupted. Cleaning up."
  fi
  if [ -b /dev/mapper/${CRYPT_LABEL} ]; then
    cryptsetup luksClose /dev/mapper/${CRYPT_LABEL}
  fi
  
  losetup -d ${LOOPBACK_DEVICE} > /dev/null 2>&1
  if [ "$1" = "nodelete" ]; then
    exit 0
  else
    rm -rf ${CRYPT_HOME}
    exit 1
  fi 
}

mkdir ${CRYPT_HOME} > /dev/null 2>&1

# Capture errors
if [ $? -ne 0 ]; then 
  if [ -d ${CRYPT_HOME} ]; then
    REASON="Directory already exists."
  else
    REASON=""
  fi
  echo "ERROR - Could not create directory '${CRYPT_HOME}'. ${REASON}"
  echo "Continuing..."
else
  echo
  echo "OK - '${CRYPT_HOME}' directory created."
fi

cd /root/crypto

if [ -f $CRYPT_DISK_FQFN ]; then
  echo "ERROR - Crypt disk already exists. Cannot continue."
  exit 1
fi

trap cleanup INT

dd if=/dev/zero of=cryptdisk bs=1M count=${CRYPT_DISK_SIZE}

# Capture errors
if [ $? -ne 0 ]; then 
  echo "ERROR - Could not create raw container. Cannot continue."
  cleanup called
  exit 1
else
  echo
  echo "OK - ${CRYPT_DISK_SIZE}MB raw device created."
fi

losetup ${LOOPBACK_DEVICE} ${CRYPT_DISK_FQFN}

# Capture errors
if [ $? -ne 0 ]
then
  echo "ERROR - Loopback device in use. Cannot continue."
  cleanup called
  exit 1
fi

cryptsetup luksFormat ${LOOPBACK_DEVICE}

# Capture errors
if [ $? -ne 0 ]
then
  echo "ERROR - Could not format the raw container. Cannot continue."
  cleanup called
  exit 1
fi

echo
echo "NOTE: Use the same password you set above!"
cryptsetup luksOpen ${LOOPBACK_DEVICE} ${CRYPT_LABEL}

# Capture errors
if [ $? -ne 0 ]; then
  echo "ERROR - Could not open LUKS CryptoFS. Cannot continue."
  cleanup called
  exit 1
else
  echo "OK - LUKS CryptoFS Opened."
fi

mkfs.ext4 /dev/mapper/${CRYPT_LABEL}

# Capture errors
if [ $? -ne 0 ]
then
  echo "ERROR - File system creation failed. Cannot continue."
  cleanup called
else
  echo "OK - Encrypted file system created."
  echo "Closing handles."
  cleanup nodelete
  exit 0
fi

After you save the above script to a file, and make the file executable (chmod 500 filename), you’re good to go. If you don’t want the encrypted vault file located at /root/crypto/, or want a vault of a different size than the rather small default of 64MB (I’m just saving a handful of AWS keys, so I didn’t need a larger vault file), edit the variables on top of the script before running it. Once started, follow the prompts and the encrypted vault file is created for you. If an error occurs during the vault creation process, if the vault file already exists, or if you cancel the script, any changes made up to that point are rolled back.

To mount and access the vault, save the following two scripts for mounting and unmounting the vault respectively:

#!/bin/bash

CRYPT_MOUNTPOINT=/mnt/crypto
CRYPT_DISK_FQFN=/root/crypto/cryptdisk
CRYPT_LABEL=crypt-disk
LOOPBACK_DEVICE=`losetup -f`

if [ ! -f ${CRYPT_DISK_FQFN} ]; then
  echo "Crypt disk '${CRYPT_DISK_FQFN}' missing. Cannot continue."
  exit 1
fi

if [ ! -d ${CRYPT_MOUNTPOINT} ]; then
  echo "Mountpoint '${CRYPT_MOUNTPOINT}' missing. Cannot continue."
  exit 1
fi

function check_mounted {
  if grep -qsE "^[^ ]+ $1" /proc/mounts; then
    _RET=true
  else
    _RET=false
  fi
}

check_mounted $CRYPT_MOUNTPOINT
if ${_RET} ; then
  echo "Mountpoint '${CRYPT_MOUNTPOINT}' already mounted. Cannot continue."
  exit 1
fi

losetup ${LOOPBACK_DEVICE} ${CRYPT_DISK_FQFN} > /dev/null 2>&1

# Capture errors
if [ $? -ne 0 ]; then
  echo "ERROR - Loopback device in use."
  exit 1
else
  echo "OK - Loopback device mapped."
fi

cryptsetup luksOpen ${LOOPBACK_DEVICE} ${CRYPT_LABEL} > /dev/null 2>&1

# Capture errors
if [ $? -ne 0 ]; then
  echo "ERROR Opening LUKS CryptoFS. Removing the loopback device."
  losetup -d ${LOOPBACK_DEVICE}
  exit 1
else
  echo "OK - LUKS CryptoFS Opened."
fi

mount /dev/mapper/${CRYPT_LABEL} ${CRYPT_MOUNTPOINT} > /dev/null 2>&1

# Capture errors
if [ $? -ne 0 ]; then
  echo "ERROR mounting CryptoFS."
  cryptsetup luksClose /dev/mapper/${CRYPT_LABEL}
  losetup -d ${LOOPBACK_DEVICE}
  exit 1
else
  echo "OK - Mounted CryptoFS."
  exit 0
fi
#!/bin/bash

CRYPT_MOUNTPOINT=/mnt/crypto
CRYPT_DISK=/root/crypto/cryptdisk
CRYPT_LABEL=crypt-disk

LOOPBACK_DEVICE=`losetup -j ${CRYPT_DISK} | awk '{print $1}' | sed '$s/.$//'`

CAN_RELEASE=true
if grep -qsE "^[^ ]+ ${CRYPT_MOUNTPOINT}" /proc/mounts; then
  umount ${CRYPT_MOUNTPOINT} > /dev/null 2>&1
  
  if [ $? -ne 0 ]; then
    echo "WARNING - Could not unmount ${CRYPT_MOUNTPOINT}! Device busy."
    CAN_RELEASE=false
  else
    echo "Crypto-disk was unmounted."
  fi  
else 
  echo "Crypto-disk was not mounted."
fi

if $CAN_RELEASE; then
  if [ -b /dev/mapper/${CRYPT_LABEL} ]; then
    cryptsetup luksClose /dev/mapper/${CRYPT_LABEL} > /dev/null 2>&1
  fi

  losetup -d ${LOOPBACK_DEVICE} > /dev/null 2>&1
fi

Similarly make these scripts executable before running them. If you modified the encrypted vault location/name, or the mount point location during the creation process, you’ll want to make corresponding changes the the variable atop these scripts.

You can place these utility scripts in /usr/local/bin or other location on your path (or symlink from a location on your path) to avoid having to type the full path every time.

With the encrypted vault created using setup-crypt, you can then mount the vault using mount-crypt and access the contents of the vault at /mnt/crypto, and finally unmount the vault with umount-crypt. Since the vault is protected by a single passoword, be sure to set an appropriately safe password to match the required security level.

To further improve the security, you probably want to unmount the vault whenever you’re not logged in. Most likely contents of a vault such as this are intended for interactive use. You can always unmount and hence “lock” the vault with umount-crypt command, but it is a good idea to run umount-crypt automatically at logout. Depending on your shell you can crete/edit .zslogout (zsh), .bash_logout (bash), or .logout (tcsh/csh) at the user home directory (likely in “/root” since opening/closing loopback handles can only be done by the root), and place the following code in it:

#!/bin/zsh
# NOTE: You need to adjust the path to the login shell above

/opt/crypto/umount-crypt

I also close the vault at system shutdown/reboot, by symlinking the following from /etc/rc6.d/S40umount-crypto:

#!/bin/bash
#
# umount-crypto - Unmounts a crypto-drive if mounted
# -> convenience script to be called in the shutdown/reboot sequence of Ubuntu
#    from /etc/rc6.d, e.g. as "/etc/rc6.d/S40umount-crypto"

start() {
	echo "umount-crypto: nothing to do!"
}

stop() {
	echo "Unmounting LUKS CryptoFS filesystem..."
	umount /mnt/crypto> /dev/null 2>&1 
        cryptsetup luksClose /dev/mapper/crypt-disk > /dev/null 2>&1
        losetup -d /dev/loop0 > /dev/null 2>&1
}

status() {
	echo "No status available."
}

restart() {
	echo "restart ..."
	start
}

reload() {
	echo "start ..."
	start
}

force_reload() {
	echo "force-reload ..."
	start
}

case $1 in
	start)
	start
	;;

	stop)
	stop
	;;

	status)
	status
	;;

	restart)
	restart
	;;

	reload)
	reload
	;;

	force-reload)
	force_reload
	;;

	*)
	echo "This is a non-interactive crypto-disk unmount script."
	;;

esac

exit 0

And that’s all there is to it! With your files safely inside a locked, encrypted vault, only you and the NSA have access to them! 😉

P.S.
To utilize the vault with Bitnami Cloud Tools, I have created folders for each AWS account I want to access under /mnt/crypto/, e.g. /mnt/crypto/aws_account_a, /mnt/crypto/aws_account_b, etc. Each folder contains similarly named files (as found in bitnami-awstools-x.x-x/config folder), like so:

aws-config.txt
aws-credentials.txt
ec2.crt
ec2.key

To switch from account to another I (re-)symlink the contents of the desired account from bitnami-awstools-x.x-x/config/, for example:

ln -sf /mnt/crypto/aws_account_b/* /opt/bitnami-awstools-x.x-x/config/

This way, once the vault is locked, the access to any and all of the AWS accounts via cloud tools goes away. Switching between the accounts could, of course, be scripted easily as well.

Replacing a Firewall/Gateway and Purging the Upstream ARP Cache with arping in Ubuntu

Over the years I have had to replace various firewall devices at co-location racks, and have equally many times been annoyed by the time it has taken to to clear the upstream (co-lo) router/gateway of the apparent stale ARP entries that point to the MAC of the retiring device. Since the external IP normally stays the same, the upstream router/gateway becomes confused and it takes some time, say, half an hour, until the upstream device cache expiration is reached and the traffic starts to flow normally again.

Facing once again such replacement I this time had to figure it out because the traffic of this particular installation could not be interrupted for 30 minutes (or however long it would take for the upstream cache to clear). I then came across Brian O’Neill’s 2012 article Changing of the Guard – Replacing a firewall and gratuitous ARP that introduced a solution in situations where there is no administrative access to the upstream devices (so that an immediate purge of the ARP cache could be triggered). Exactly what I was looking for!

In the article Brian uses a Linux server temporarily with a spoofed MAC address of the new firewall appliance to trigger the ARP cache flush with help of arping command. In my case I was installing Shorewall on Ubuntu 12.04, so I could use arping from the firewall server itself. I went ahead and installed arping (apt-get install arping), but it turned out the default arping package on Ubuntu does not include the required “-U” (‘unsolicited’, or gratuitous ARP). Fortunately an alternative package “iputils-arping” implements the unsolicited switch. With iputils-arping installed the command is still “arping”, and so the command Brian offered works as-is:

arping –U –c 5 –I eth1 192.168.1.1

Where “-c” indicates how many times the information is broadcast, “-I” obviously defines the interface connected to the upstream router/gateway, and the IP is the external IP of your firewall/gateway device.

Flexible LAN Name Server System with Partial Zone Overrides using BIND and Unbound

(“TL;DR”? Don’t bother! ;))

Since the early 2000’s I have been using BIND to provide name service for the LANs that I set up and/or maintain. Some time ago it became necessary to find a solution for a use case where an internal name server needed to be able to override and/or add some subdomains to an externally authoritative zones, while resolving the rest [of that zone] from its authoritative source (and, of course, provide internal resolution for the LAN’s internal zone(s)).

The only resolver that provides partial (“transparent”) override of an external zone is Unbound. However, Unbound is only an iterative resolver, and while it provides the option to inject “local zone data” which behaves as if it were authoritative (for all practical purposes), it is not such. Unbound is very efficient in what it does, and it’s secure, but to provide a fully functional name server it needs to be coupled with an authoritative server. I spent some time trying out NSD, considering whether I could adopt it as the auth zone server, especially since it’s also made by NLnet Labs like Unbound. HOwever, after some testing I opted to keep BIND as the authoritative server, mainly because in the LAN use the goal was to select the most versatile components – features trumped [possible] security benefits. In addition to my overall familiarity with BIND, I missed the ACLs, and the $GENERATE statement, both which modern BIND offers.

The next steps were to make BIND and Unbound to play well together, and to figure out how Unbound could be mirrored since it doesn’t natively include IXFR style zone transfers, or in fact any type of replication. If I were to use Unbound to partially override externally authoritative zones, I didn’t want to have to manually keep the overriding zone data in sync on multiple servers.

Below is a diagram of the complete system. For clarity’s sake only one mirror (“DNS2”) is illustrated; adding more mirrors is a trivial task.

DNS-system_small
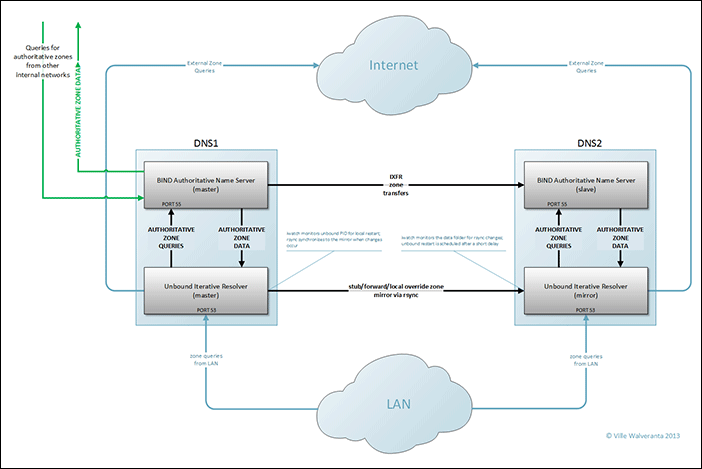
(click the image for the full size version; a PDF version is also available)

Once I had set up BIND master and BIND slave, I set up the standard IXFR zone transfer between them, and tested that it works. Since it’s outside of the scope of this article, I let you research/figure it out on your own (if you’re not already familiar with the process). Once I got it working I set BIND to listen on a LAN address on a non-standard port 55. This is because Unbound that will be serving the DNS queries from the LAN will be listening on the default DNS port 53. BIND’s port 55 accepts queries from the Unbound server (in this case, the same server), and also from other LAN segments whose respective resolvers might forward queries for the zones this BIND installation is authoritative for. In some cases BIND also provides in-addr.arpa (reverse) resolution externally (access to internal zone resolution or recursion is prohibited by an ACL), and in such cases the firewall NAT translates the external port 53 to port 55 on BIND.

With Unbound configured I toggled its default setting with do-not-query-localhost: no since BIND instance resides on the same server. Without that directive Unbound won’t query authoritative zones on BIND at 127.0.0.1:55. Now stub zones on Unbound are able to complete queries for zones for whom BIND is the authoritative server. The Unbound stub entry looks like this:

#
# STUB ZONE: mylocalzone.net
#

private-domain: "mylocalzone.net"

stub-zone:
    name: "mylocalzone.net"
    stub-addr: 127.0.0.1@55


##[terminator]##
server:

You will notice the “##[terminator##” segment in the end of the stub zone file above. Since I like to break out my stub, forward, and “extended” (override) zones into individual config files, the “server:” statement terminates the local-zone segment allowing other content to follow in the unbound.conf from where these are included.

A extended, or “override” zone file (the impetus for this whole excercise), is equally simple:

#
# OVERRIDES FOR EXTERNAL ZONE: cnn.com
#

private-domain: "cnn.com"
local-zone: "cnn.com" transparent

local-data: "mysubdomain.cnn.com.     IN A 10.0.0.5"


##[terminator]##
server:

With the above simple example the zone “cnn.com” will resolve normally along with its any an all defined subdomains (www.cnn.com, etc.), except for “mysubdomain.cnn.com” which is now valid on your LAN with an IP 10.0.0.1. While just an example, such overrides tend to be more useful when applied, for example, to company domains where you need to add subdomains on the internal LAN for intranet, development, etc. while relying on the default external authoritative source for the remainder of the zone.

Now for the interesting part: Implementing the Unbound mirroring. Since Unbound doesn’t provide IXFR or other methods for zone transfer/replication, I have created a handful of shell scripts that take care of the task. At the time of writing of this I’m running this setup on Ubuntu 12.04LTS servers and hence the following prerequisite utilities are available: iwatch, lockfiles-progs, and rsync.

On the master server service “unbound-push-service” is installed. When changes occur (unbound is restarted), the service detects the change and executes another script (trigger-unbound-rsync) which with the help of rsync synchronizes Unbound zone data to the mirror(s). On the mirror(s) a service “unbound-restart-service” is installed. The service utilizes iWatch to detect content changes in the Unbound zone data folder. When changes are detected, “trigger-unbound-restart” is triggered. After a wait for a few seconds (to ensure that the transfer is complete), the script command “unbound-trigger-command” is run and Unbound is restarted, hence making the updated zone data live.

For the above to work the prerequisite utilities must be installed, a rsync (ssh) key needs to be configured between the master and the mirror(s), the monitoring services must be installed on source and the mirror, and the Unbound zone files must be separated to a folder of their own. I’ll step you through the process below with examples and necessary scripts along the way.

First, make sure the prerequisite utilities are installed on both the master and the mirror (note: all tasks below assume you’re running as a root; if not, add sudo as needed):

apt-get install iwatch rsync lockfile-progs

Copy the following utility scripts to the master (I use /opt/unbound-push/ as the folder, but you can choose a location that suits you best):

unbound-push-service:

#!/bin/bash
# unbound-push daemon
# chkconfig: 345 20 80
# description: unbound-push daemon
# processname: unbound-push

###########################
# prereqs: iwatch


DAEMON_PATH="/usr/bin"

DAEMON=iwatch
DAEMONOPTS="-c /opt/unbound-push/trigger-unbound-rsync -e close_write /var/run/unbound.pid"

NAME=unbound-push
DESC="Pushes config changes to DNS2 on Unbound restart"
PIDFILE=/var/run/$NAME.pid
SCRIPTNAME=/etc/init.d/$NAME

case "$1" in
start)
        printf "%-50s" "Starting $NAME..."
        cd $DAEMON_PATH
        PID=`$DAEMON $DAEMONOPTS > /dev/null 2>&1 & echo $!`
        #echo "Saving PID" $PID " to " $PIDFILE
        if [ -z $PID ]; then
            printf "%sn" "Fail"
        else
            echo $PID > $PIDFILE
            printf "%sn" "Ok"
        fi
;;
status)
        printf "%-50s" "Checking $NAME..."
        if [ -f $PIDFILE ]; then
            PID=`cat $PIDFILE`
            if [ -z "`ps axf | grep ${PID} | grep -v grep`" ]; then
                printf "%sn" "Process dead but pidfile exists"
            else
                echo "Running"
            fi
        else
            printf "%sn" "Service not running"
        fi
;;
stop)
        printf "%-50s" "Stopping $NAME"
            PID=`cat $PIDFILE`
            cd $DAEMON_PATH
        if [ -f $PIDFILE ]; then
            kill -HUP $PID
            printf "%sn" "Ok"
            rm -f $PIDFILE
        else
            printf "%sn" "pidfile not found"
        fi
;;

restart)
        $0 stop
        $0 start
;;

*)
        echo "Usage: $0 {status|start|stop|restart}"
        exit 1
esac

trigger-unbound-rsync:

 $LOCKFILE

    /usr/bin/rsync -vaz --delete -e "ssh -i /root/.ssh/dns-push.id_rsa" /etc/unbound/zonedata /etc/unbound/conf.d unbound@mirrordns.mylocalzone.net:/etc/unbound/ &> /opt/unbound-push/push.log
    kill -9 $(cat ${LOCKFILE}) 
    /usr/bin/lockfile-remove --quiet --lock-name $LOCKFILE
fi

exit 0

Copy the following utility scripts to the mirror (I use /opt/unbound-trigger/ as the folder, but you can choose a location that suits you best):

unbound-restart-service:

 /dev/null 2>&1 & echo $!`
        #echo "Saving PID" $PID " to " $PIDFILE
        if [ -z $PID ]; then
            printf "%sn" "Fail"
        else
            echo $PID > $PIDFILE
            printf "%sn" "Ok"
        fi
;;
status)
        printf "%-50s" "Checking $NAME..."
        if [ -f $PIDFILE ]; then
            PID=`cat $PIDFILE`
            if [ -z "`ps axf | grep ${PID} | grep -v grep`" ]; then
                printf "%sn" "Process dead but pidfile exists"
            else
                echo "Running"
            fi
        else
            printf "%sn" "Service not running"
        fi
;;
stop)
        printf "%-50s" "Stopping $NAME"
            PID=`cat $PIDFILE`
            cd $DAEMON_PATH
        if [ -f $PIDFILE ]; then
            kill -HUP $PID
            printf "%sn" "Ok"
            rm -f $PIDFILE
        else
            printf "%sn" "pidfile not found"
        fi
;;

restart)
        $0 stop
        $0 start
;;

*)
        echo "Usage: $0 {status|start|stop|restart}"
        exit 1
esac

trigger-unbound-restart:

 $LOCKFILE
    /usr/bin/nohup /opt/unbound-trigger/unbound-trigger-command $DELAY $LOCKFILE > /dev/null 2>&1 &
fi

exit 0

unbound-trigger-command:

So far so good. Now that all the prerequirements are in place; let’s do some configuration. The following assumes the above mentioned locations (/opt/unbound-push on the master and /opt/unbound-trigger on the mirror) for the script/service files.

On the Master:

  1. Symlink /opt/unbound-push/unbound-push-service from /etc/init.d:
    ln -s /opt/unbound-push/unbound-push-service /etc/init.d
  2. Install the service:
    update-rc.d unbound-push-service defaults
  3. Create an RSA key specifically to push content via rsync to the mirror server:
    ssh-keygen -f /root/.ssh/dns-unbound-sync.id_rsa
    ** Choose no password to protect the private key! **
  4. Copy the public key to the mirror server via scp
  5. Add to (or create if the file doesn’t exist) /root/.ssh/config:
    Host mirrordns.mylocalzone.net
    HostName mirrordns.mylocalzone.net
    User unbound
    IdentityFile ~/.ssh/dns-unbound-sync.id_rsa
    StrictHostKeyChecking no
  6. Double-check rsync configuration in /opt/unbound-push/trigger-unbound-rsync for the key file name, target IP (IP may be preferable over a domain name since this is part of the DNS fabric; this needs to work regardless even if resolution is not [yet] working), etc.

And on the mirror:

  1. Symlink /opt/unbound-trigger/unbound-restart service from /etc/init.d:
    ln -s /opt/unbound-trigger/unbound-restart-service /etc/init.d
  2. Install the service:
    update-rc.d unbound-restart-service defaults
  3. Modify the unbound user’s shell with vipw: /bin/false -> /bin/bash
  4. Make sure /etc/unbound and its contents are owned by unbound.unbound:
    chown -R unbound.unbound /etc/unbound
  5. Create “.ssh” directory for unbound user, make sure it is owned by unbound.unbound, and that its permissions are set to 700:
    mkdir /var/lib/unbound/.ssh
    chown unbound.unbound /var/lib/unbound/.ssh
    chmod 700 /var/lib/unbound/.ssh
  6. Move the public RSA key for “unbound” user from the path where you transferred it to from the Master server above (see “On the Master, #4”), make sure it’s owned by unbound.unbound, and set its permissions to 600. The target file name, “authorized_keys2” is significant.
    mv /some/path/to/the/public/rsa_key /var/lib/unbound/.ssh/authorized_keys2
    chown unbound.unbound /var/lib/unbound/.ssh/authorized_keys2
    chmod 600 /var/lib/unbound/.ssh/authorized_keys2
  7. If /etc/ssh/sshd_config limits which users can log in, the transfer user (which is “unbound” if you followed the above steps) must be allowed to log in.

Mirroring configuration is now complete! Since the scripts above monitor specific directory structure under /etc/unbound, I should quickly review it before we proceed to start the services and test the zone mirroring.

As I mentioned earlier, I have local data (stub, forward, and extended zone) broken into separate files. The structure under /etc/unbound looks like this:

/etc/unbound/ – main configuration
/etc/unbound/conf.d – user configuration (local data includes, access control list); monitored and synced to mirror
/etc/unbound/zonedata – local data files; monitored and synced to mirror

Here’s an example unbound.conf:

# Unbound configuration file
#
# See the unbound.conf(5) man page.
#
# See /usr/share/doc/unbound/examples/unbound.conf 
# for a commented reference config file, or download
# a free eBook "Alternative DNS Servers" from 
# http://jpmens.net/2010/10/29/alternative-dns-servers-the-book-as-pdf/
# that has a good chapter on Unbound.

server:
    # The following line will configure unbound to perform cryptographic
    # DNSSEC validation using the root trust anchor.
    auto-trust-anchor-file: "/var/lib/unbound/root.key"

    interface:      10.0.0.50
    interface:      127.0.0.1
    port:           53

    # Outgoing-interface is masq'ed to the external IP at the firewall/gateway.
    outgoing-interface: 10.0.0.50 

    directory:      "/etc/unbound"
    chroot:         ""
    username:       "unbound"

    # include access control
    include:        /etc/unbound/conf.d/access-control.conf

    # The authoritative server (BIND) is on the localhost so toggle the default..
    do-not-query-localhost: no
    do-ip6:         no
    pidfile:        "/var/run/unbound.pid"

    root-hints:     "/etc/unbound/root.hints"
    module-config:  "iterator"
    # validator has been disabled in module-config above by not including it; 
    # queries FAIL if it's enabled and DNSSEC fails!

    identity:       "resolver.mypubliczone.net"
    hide-version:   yes

    verbosity:      2
    use-syslog:     yes
    logfile:        "/var/log/unbound/unbound.log"
    log-time-ascii: yes
    log-queries:    yes

    # include zone data
    include:        "/etc/unbound/conf.d/zones.conf"

    forward-zone: 
        name: "."
        forward-addr: 4.2.2.1
        forward-addr: 4.2.2.2
        forward-addr: 4.2.2.3
        forward-addr: 4.2.2.4
        forward-addr: 4.2.2.5
        forward-addr: 4.2.2.6
        forward-addr: 8.8.8.8
        forward-addr: 8.8.4.4

The above configuration includes couple of files:

/etc/unbound/conf.d/access-control.conf (here you define IPs/networks that are allowed to query/recurse through this Unbound instance):

#
# HOSTS AND NETWORKS THAT ARE ALLOWED TO RESOLVE/RECURSE
#

access-control: 127.0.0.1/32 allow
access-control: 10.0.0.0/24 allow

/etc/unbound/conf.d/zones.conf (here you include the stubs/forwarders/overrides; you could also instead include the files directly from the zonedata folder, but at the time of writing of this Unbound doesn’t yet support inclusion by wild card, though it is coming. I find explicit inclusions safer, though).

#
# DEFINE STUB/FORWARD/OVERRIDE ZONE FILES
#

# stubs to local authoritative zones (resolved by local BIND):
include:  "/etc/unbound/zonedata/S_mylocalzone.net"
include:  "/etc/unbound/zonedata/S_0.0.10.in-addr.arpa"

# stubs/forwarders for remote authoritative zones:
include:  "/etc/unbound/zonedata/S_my.remotezone.com"

# local overrides for remote authoritative zones:
include:  "/etc/unbound/zonedata/X_cnn.com"

/etc/unbound/zonedata/S_mylocalzone.net:

#
# STUB ZONE: mylocalzone.net
#

private-domain: "mylocalzone.net"

stub-zone:
    name: "mylocalzone.net"
    stub-addr: 127.0.0.1@55


##[terminator]##
server:

/etc/unbound/zonedata/S_0.0.10.in-addr.arpa (NOTE: the ‘nodefault’ entries for local-zones are significant!):

#
# STUB ZONE: 0.0.10.in-addr.arpa
#

local-zone:  "10.in-addr.arpa" nodefault
local-zone:  "0.0.10.in-addr.arpa" nodefault

stub-zone:
    name: "0.0.10.in-addr.arpa"
    stub-addr: 127.0.0.1@55


##[terminator]##
server:

/etc/unbound/zonedata/S_my.remotezone.com (e.g. a zone from another ‘internal’ network such as another LAN):

#
# STUB ZONE: my.remotezone.com
#

private-domain: "my.remotezone.com"

stub-zone:
    name: "my.remotezone.com"
    stub-addr: 172.16.0.10@55

##[terminator]##
server:

/etc/unbound/zonedata/X_cnn.com (override remote zone partially):

#
# OVERRIDES FOR EXTERNAL ZONE CNN.COM
#

private-domain: "cnn.com"
local-zone: "cnn.com" transparent

local-data: "mysubdomain.cnn.com.     IN A 10.0.0.5"


##[terminator]##
server:

In the zonedata directory I have a reminder to include files that are added there:

********************************************************************
** IF YOU ADD A ZONE FILE HERE, REMEMBER TO ADD THE CORRESPONDING **
** REFERENCE IN /etc/unbound/conf.d/zones.conf                    **
********************************************************************

.. and a quick template for the file types:

 X_ = eXtended zone (a local-zone with "deny", "refuse", "static",
      "transparent", "redirect", "nodefault", or "typetransparent"
      type). Extended zones are full or partial overrides of zones     
      whose authority is elsewhere on the Interwebs.
      USE EXTENDED ZONES TO OVERRIDE OR ADD TO EXTERNAL ZONES.

 S_ = Stub zone; stub zones are dynamic pointers to zones whose 
      authority  lies outside of unbound. Capable of zone tranasfers.   
      USE STUB ZONES TO REFERENCE COMPANY-INTERNAL ZONES.

 F_ = Forward zone; forward zones are static pointers to zones
      whose authority lies outside of unbound. Incapable of zone
      transfers; forwarder name servers must be manually updated. 
      USE FORWARD ZONES TO DIRECT QUERIES FOR SPECIFIC REMOTE ZONES
      TO SPECIFIC REMOTE NAME SERVERS.


 ** Edit AUTHORITATIVE LOCAL ZONE DATA in                             
    /etc/bind/master/ on DNS1.mylocalzone.net,
    and OVERRIDES FOR EXTERNAL ZONES in                            
    /etc/unbound/zonedata/ on DNS1.mylocalzone.net!

 ** DNS2.mylocalzone.net is a SLAVE/MIRROR ONLY!!!

Finally, let’s start the monitoring/triggering services and do some testing. On Master execute service unbound-push-service start, and on the slave execute service unbound-restart-service start.

Test SSH connectivity from master to slave. When logged in as root, you should be able to connect to the mirror as the unbound user simply by typing “ssh mirrordns.mylocalzone.net”. Test rsync from master to mirror (build your own rsync command, or use one from trigger-unbound-rsync file.

Once the above tests are completed successfully, test the DNS mirroring by adding an empty file in /etc/unbound/zonefiles on the master, and then restart unbound; now observe: 1) rsync push on the master, 2) initiation of the unbound-trigger-command with 10 second delay on the mirror, and ultimately 3) changing PID of the Unbound service on the mirror as it is automatically restarted, hence bringing the mirrored changes live also on the secondary server.

If it doesn’t appear to be working, logs are your friend. Start by looking at a small transfer log on the master at /opt/unbound-push/push.log, then review ssh/syslogs on both servers, and finally unbound/BIND logs on both systems.

Whoa! That was lots of content! Maybe I should’ve published this as a book? 😀 I hope this proves useful for someone down the line. I have the above configuration running on half a dozen networks, and once set up it has been very peformant and highly stable.